
Wednesday, 25 December 2013
Monday, 21 October 2013
Great Modahaus Giveaway
The Modahaus set-up for jewelry photography is perfect for all of us who aren't as good at photography as we think we are at making jewelry! I bought the mini model and it's amazing how much it can improve the pictures of your creations.
Pearl of The Beading Gem has a great giveaway from Modahaus of their all-purpose tabletop model and, although I hate to tell anyone else about the giveaway, I get an extra entry for sharing it on my blog.
So check out Pearl's description of the Modahaus and enter the contest!
http://www.beadinggem.com/2013/10/modahahus-ts320-tabletop-studio-giveaway.html
Friday, 17 May 2013
Just One More Dog Post!
Sorry, I can't help it; consider yourself lucky that I don't have babies!
The dogs and I made a road trip in April to visit family in Ontario. My sister is very fussy about how poodles should and should not look and Corky fit right into the "should not" category so she stole him one day (he was not impressed) and fixed him. So he had a makeover and now I have a before and after photo.

Yes, he certainly does look much better. Although he went from "cute and cuddly" to "elegant and sophisticated."

And to prove his sophistication:
 Isn't that an elegant position?
The dogs and I made a road trip in April to visit family in Ontario. My sister is very fussy about how poodles should and should not look and Corky fit right into the "should not" category so she stole him one day (he was not impressed) and fixed him. So he had a makeover and now I have a before and after photo.

Yes, he certainly does look much better. Although he went from "cute and cuddly" to "elegant and sophisticated."

And to prove his sophistication:

Sunday, 28 April 2013
Dewey and Corky


Sunday, 24 March 2013
Brass Bird Shadowbox or two in the bush
I think I saw something like this somewhere in my prodigious reading and if so, I apologize to the originator. If I didn't, maybe I dreamed it because that's happened more than once. Sometimes I even dream that I'm reading, which really confuses the issue.
Since I got the rolls of thin brass and copper, this has been one of my goals but it took two attempts to get it right. And a lot of playing around to figure it out. I think I'll do a down-and-dirty tutorial when I get time in case anybody else wants to do a shadowbox.

There are a few things I'd do differently if I did another one and a few things that really show up in an enlarged picture that you don't notice at regular size. But it was fun and I'm pleased.
Saturday, 16 February 2013
Experiments with foil
Do you remember using the copper etching kits when you were a kid? Maybe you have to be a baby boomer because I haven't seen them for years. You got a box with a sheet of copper, tracing paper, a design, wooden sticks to emboss and repousse and a little vial of solution to darken the low spots. Sound familiar?
They've been on my mind for some time because I wanted the copper. Something light enough in gauge to be able to do the embossing and repoussing (is that a word?) to make some really interesting jewellery pieces. No luck at all, anywhere, until John Rasmussen suggested Whimsie Studio, which has not only copper, but brass and aluminum! Woo Hoo, success at last, I thought. And then found out that Whimsie will not export. So John stepped up and offered to be the intermediary, shipping-wise, which he did. And because I couldn't order direct, instead of ordering small in case my ideas didn't work, I ordered a roll each of copper and brass. I might be doing all sorts of copper and brass embellishments around the house.

First step was to cut a piece of copper foil about an inch-and-a-half square and see if it was going to be easy to do the stuff. You know, the in and out stuff. Embossing and that other word that spell-check doesn't like. A pencil was perfect for drawing the design, the tools were little double-ended metal ball-type things that came from the hobby section of the dollar store. I have no idea what they were originally intended for but they were just the ticket here for the rubbing. I used the sharp end of a pair of compasses carefully over the pencil drawing to line the design. The compass was pretty handy too, for making the double line even all the way around, even though this was just an experiment.
 Second step was to see if I could solder the foil sheet onto a sheet of heavier copper. I wasn't sure if the heat required to melt solder would also melt the foil sheet and I'm a rank amateur at the soldering business so anything is possible.
The first attempt, I used extra easy solder pieces and sweat soldered it onto the back of the foil piece. I was using my mini-torch and it's almost out of juice so it melted the solder, didn't melt the foil but wasn't hot enough to heat the copper backing enough to make the transfer and hold the two pieces together.
Having learned the hard way that dirty solder will not melt and will not stick, I took my foil piece to the kitchen sink and scrubbed it with a piece of steel wool. Unfortunately, I forgot that the heat had made the little piece butter soft and I scrubbed away part of my design before I realized what I was doing.
 I used a piece of sandpaper (carefully) to finish cleaning both pieces and tried it again with a plumbers torch and some easy paste solder. This time the two pieces soldered together, although on a "good" piece, I'd worry more about all the edges being perfectly flat. Two big lessons learned here: clean with sandpaper GENTLY and use less paste solder, further inside the top piece, so that it doesn't squish out when it melts.
The blacking was just done with a black sharpie with a quick sanding, just so that I could see what a finished piece would kinda look like.
Conclusion? This is going to open up some fun possibilities for me if I take my time and remember the lessons learned. Copper backing will work and leather too, although that might be a whole different experiment!
They've been on my mind for some time because I wanted the copper. Something light enough in gauge to be able to do the embossing and repoussing (is that a word?) to make some really interesting jewellery pieces. No luck at all, anywhere, until John Rasmussen suggested Whimsie Studio, which has not only copper, but brass and aluminum! Woo Hoo, success at last, I thought. And then found out that Whimsie will not export. So John stepped up and offered to be the intermediary, shipping-wise, which he did. And because I couldn't order direct, instead of ordering small in case my ideas didn't work, I ordered a roll each of copper and brass. I might be doing all sorts of copper and brass embellishments around the house.

First step was to cut a piece of copper foil about an inch-and-a-half square and see if it was going to be easy to do the stuff. You know, the in and out stuff. Embossing and that other word that spell-check doesn't like. A pencil was perfect for drawing the design, the tools were little double-ended metal ball-type things that came from the hobby section of the dollar store. I have no idea what they were originally intended for but they were just the ticket here for the rubbing. I used the sharp end of a pair of compasses carefully over the pencil drawing to line the design. The compass was pretty handy too, for making the double line even all the way around, even though this was just an experiment.

The first attempt, I used extra easy solder pieces and sweat soldered it onto the back of the foil piece. I was using my mini-torch and it's almost out of juice so it melted the solder, didn't melt the foil but wasn't hot enough to heat the copper backing enough to make the transfer and hold the two pieces together.
Having learned the hard way that dirty solder will not melt and will not stick, I took my foil piece to the kitchen sink and scrubbed it with a piece of steel wool. Unfortunately, I forgot that the heat had made the little piece butter soft and I scrubbed away part of my design before I realized what I was doing.

The blacking was just done with a black sharpie with a quick sanding, just so that I could see what a finished piece would kinda look like.
Conclusion? This is going to open up some fun possibilities for me if I take my time and remember the lessons learned. Copper backing will work and leather too, although that might be a whole different experiment!
Kazuri Beads
This post requires some thanks: to Pearl, The Beading Gem, who introduced me to Kazuri Beads through her blog and Deb Thivierge of Karibu Beads (www.karibubeads.com) who processed a very small order with great speed and great customer service most companies reserve for their very best customers. Here's the Kazuri story from Deb's website and the Kazuri website:
Kazuri Founder - Lady Susan Wood was born (1918) in a mud hut in an African village. Her parents were missionaries from England in the Ituri Forest. Lady Wood was sent back to England to be educated and married Michael Wood, a surgeon. They came to Kenya in 1947. They were dedicated to making a difference and Lady Wood started a coffee plantation on the Karen Blixen estate, famous from the award winning movie "Out of Africa" , at the foot of the Ngon'g Hills, about 30 minutes from the bustling Nairobi city center in Kenya. Lady Wood was a visionary, an unsung hero of her time. She assisted her husband in founding the East African Flying Doctor Service, which expanded into the African Medical Research Foundation (AMREF) of which Michael Wood was Director General for 29 years. Michael Wood was knighted in 1985.
 In 1975, Lady Susan Wood set up a fledging business making beads in a
small shed in her back garden. She started by hiring two disadvantaged
women, and quickly realized that there were many more women who were in
need of jobs and so Kazuri Beads was created and began its long and
successful journey as a help center for the needy women especially
single mothers who had no other source of income. In 1988 Kazuri became a
factory and expanded hugely with over 300 women and men. Here women are
trained and apply their skills to produce these unique and beautiful
beads and jewelry. The beads are made with clay from the Mt Kenya area
thus giving them authenticity to their craft. The factory acts as a
social gathering with the hum of voices continuing throughout the day.
With unemployment so high, one jobholder often ends up providing for an
"extended family" of 20 or more. Kazuri is a member of the Fair Trade
Act
In 1975, Lady Susan Wood set up a fledging business making beads in a
small shed in her back garden. She started by hiring two disadvantaged
women, and quickly realized that there were many more women who were in
need of jobs and so Kazuri Beads was created and began its long and
successful journey as a help center for the needy women especially
single mothers who had no other source of income. In 1988 Kazuri became a
factory and expanded hugely with over 300 women and men. Here women are
trained and apply their skills to produce these unique and beautiful
beads and jewelry. The beads are made with clay from the Mt Kenya area
thus giving them authenticity to their craft. The factory acts as a
social gathering with the hum of voices continuing throughout the day.
With unemployment so high, one jobholder often ends up providing for an
"extended family" of 20 or more. Kazuri is a member of the Fair Trade
Act
 Today
Kazuri, the Swahili word for "small and beautiful" produces a wide
range of hand made, hand painted ceramic jewelry that shines with a
kaleidoscope of African colors and Kenyan art that reflects a culture
and appeal to a worldwide fashion market. Kazuri's beautifully finished
products are made to an international standard and are sold worldwide.
These standards are maintained through high training standards and a
highly motivated management team.
Today
Kazuri, the Swahili word for "small and beautiful" produces a wide
range of hand made, hand painted ceramic jewelry that shines with a
kaleidoscope of African colors and Kenyan art that reflects a culture
and appeal to a worldwide fashion market. Kazuri's beautifully finished
products are made to an international standard and are sold worldwide.
These standards are maintained through high training standards and a
highly motivated management team.
In 2001 Mark and Regina Newman bought the company and their goal is to further increase the size of the company and to maintain the guiding philosophy ... to provide employment opportunities for disadvantaged members of Kenyan Society.
After reading about the Kazuri story and seeing the beautiful beads, I had to have some and as I said, placed a very small order.

I forgot to take pictures before I took the necklace to the store and grabbed a few while they were there so the quality isn't the greatest. Although the quality is pretty well normal for me. Don't you just love the giraffe?
 The beads are beautiful and the two at the very top are donut beads saying "hope" in English and Swahili.
Kazuri Founder - Lady Susan Wood was born (1918) in a mud hut in an African village. Her parents were missionaries from England in the Ituri Forest. Lady Wood was sent back to England to be educated and married Michael Wood, a surgeon. They came to Kenya in 1947. They were dedicated to making a difference and Lady Wood started a coffee plantation on the Karen Blixen estate, famous from the award winning movie "Out of Africa" , at the foot of the Ngon'g Hills, about 30 minutes from the bustling Nairobi city center in Kenya. Lady Wood was a visionary, an unsung hero of her time. She assisted her husband in founding the East African Flying Doctor Service, which expanded into the African Medical Research Foundation (AMREF) of which Michael Wood was Director General for 29 years. Michael Wood was knighted in 1985.
The beginnings of Kazuri Beads
In 1975, Lady Susan Wood set up a fledging business making beads in a
small shed in her back garden. She started by hiring two disadvantaged
women, and quickly realized that there were many more women who were in
need of jobs and so Kazuri Beads was created and began its long and
successful journey as a help center for the needy women especially
single mothers who had no other source of income. In 1988 Kazuri became a
factory and expanded hugely with over 300 women and men. Here women are
trained and apply their skills to produce these unique and beautiful
beads and jewelry. The beads are made with clay from the Mt Kenya area
thus giving them authenticity to their craft. The factory acts as a
social gathering with the hum of voices continuing throughout the day.
With unemployment so high, one jobholder often ends up providing for an
"extended family" of 20 or more. Kazuri is a member of the Fair Trade
Act
Kazuri Beads Today
Today
Kazuri, the Swahili word for "small and beautiful" produces a wide
range of hand made, hand painted ceramic jewelry that shines with a
kaleidoscope of African colors and Kenyan art that reflects a culture
and appeal to a worldwide fashion market. Kazuri's beautifully finished
products are made to an international standard and are sold worldwide.
These standards are maintained through high training standards and a
highly motivated management team.
In 2001 Mark and Regina Newman bought the company and their goal is to further increase the size of the company and to maintain the guiding philosophy ... to provide employment opportunities for disadvantaged members of Kenyan Society.
After reading about the Kazuri story and seeing the beautiful beads, I had to have some and as I said, placed a very small order.

I forgot to take pictures before I took the necklace to the store and grabbed a few while they were there so the quality isn't the greatest. Although the quality is pretty well normal for me. Don't you just love the giraffe?

Thursday, 24 January 2013
New Home New Workshop WooHoo!
The perfect house for me and the dogs came up for sale just three doors up from my store and although it wasn't part of the business plan for a few years, it was too good an opportunity to miss.
House pictures may or may not come later but this house has three big pluses that made it more than perfect for me:
A mudroom/porch so muddy/wet/snowy dogs can dry off BEFORE running through the kitchen and jumping on the couch, and said mudroom has a worktable perfect for torch work. It was probably designed for folding laundry but oh well.
A walk-in closet the size of a small bedroom off the master bedroom. Every woman's dream, a friend called it.
AND...(trumpet tootle) a room off the livingroom big enough to use half of it as an office and the other half as a workshop! No more kitchen table!
This is a workshop on a budget. No money left after buying the house.
 The room has a built-in bookcase, still a work in
progress but with room on the lower shelf for my
tumbler and a plug directly below it. Jewellery
books and other stuff on the shelves and stuff still
not unpacked on the floor. It's coming.
 I'd say the old computer table was a lucky find but I looked hard for what I had in mind and finally found this one at the Habitat for Humanity's Restore for $15.00. Can't beat the price. It has a bookcase at one end just tall enough for my display busts. The slide-out keyboard tray is great for having stuff handy but normally out of sight. And it was cheap enough that I won't feel guilty whacking on it with hammers.
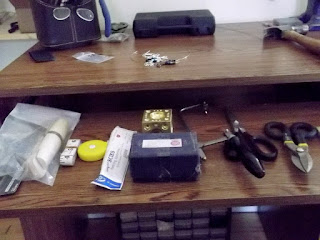
I forgot to move my cordless drill and big hammer - they aren't for jewellery - I was hanging pictures.
The little container with my tools in it was a handy find a few years ago. It's a TV remote caddy and it swivels on a round base so you can grab tools from
either side or the middle.

In case you wondered, the little green ashtray is a holder for those rubber earring stops. It doesn't matter how organized I am, I never seem to be able to remember where I put those things and when I find them, they try to escape, so the ashtray is now their permanent home.
My new favourite thing is the magnetic tool bar. I get email flyers from Lee Valley Tools and this was on the most recent. Twenty-four inches and it'll hold three pounds (or kilos, can't remember which!)
 for a reasonable price of $19.98. How cool is that? All the tools I use the most right in front of my nose!
It made a little room in the TV caddy too, because it was getting crowded. That's a steel ruler sitting on top of it.
The magnifying light was a Lee Valley special too but I bought it a few years ago. It clamps on and it'll be so much nicer to have it permanently clamped instead of having to take it out and put it away.
Now, with the perfect place to work, organized and efficient, there should be no excuse for not getting to work and do some creating! Should be.
House pictures may or may not come later but this house has three big pluses that made it more than perfect for me:
A mudroom/porch so muddy/wet/snowy dogs can dry off BEFORE running through the kitchen and jumping on the couch, and said mudroom has a worktable perfect for torch work. It was probably designed for folding laundry but oh well.
A walk-in closet the size of a small bedroom off the master bedroom. Every woman's dream, a friend called it.
AND...(trumpet tootle) a room off the livingroom big enough to use half of it as an office and the other half as a workshop! No more kitchen table!
This is a workshop on a budget. No money left after buying the house.

progress but with room on the lower shelf for my
tumbler and a plug directly below it. Jewellery
books and other stuff on the shelves and stuff still
not unpacked on the floor. It's coming.

I forgot to move my cordless drill and big hammer - they aren't for jewellery - I was hanging pictures.
The little container with my tools in it was a handy find a few years ago. It's a TV remote caddy and it swivels on a round base so you can grab tools from
either side or the middle.

In case you wondered, the little green ashtray is a holder for those rubber earring stops. It doesn't matter how organized I am, I never seem to be able to remember where I put those things and when I find them, they try to escape, so the ashtray is now their permanent home.
My new favourite thing is the magnetic tool bar. I get email flyers from Lee Valley Tools and this was on the most recent. Twenty-four inches and it'll hold three pounds (or kilos, can't remember which!)

It made a little room in the TV caddy too, because it was getting crowded. That's a steel ruler sitting on top of it.
The magnifying light was a Lee Valley special too but I bought it a few years ago. It clamps on and it'll be so much nicer to have it permanently clamped instead of having to take it out and put it away.
Now, with the perfect place to work, organized and efficient, there should be no excuse for not getting to work and do some creating! Should be.
Subscribe to:
Posts (Atom)