Saturday 25 November 2017

Gluten Free Christmas Cake For One

Having to go gluten free hasn't helped my waistline at all, because most gluten free products are full of either sugar or fat to help them taste better. So recently, I stocked up on coconut and almond flour and leaned more towards the Paleo diet. So far, 23 pounds and counting! I'm trying to do it more as a lifestyle change than a diet, so I can stick to it forever, have the occasional treat and not be constantly craving.
And speaking of craving...I was picking up some nuts at the Bulk Barn yesterday and chatted for a few minutes with a lady buying candied fruit for baking Christmas cakes. I never like Christmas cakes much before I couldn't have them, but watching her scoop her fruit, that's all I could think of! So, of course, I bought a small container of mixed candied fruit, having no idea what I could do with them. And with no intention of making a whole cake of any kind, because I have no willpower and would eat the whole thing in two days.
Yay Google! I found a recipe for a vanilla mug cake on wholesomeyum.com. Luckily, I had everything needed, including stevia for sweetener. My mother would have been proud of me, because usually I substitute something, if not several somethings, when I make a recipe. So I mixed it all together, let it rest for a minute until it thickened a little and then mixed in a scoop of candied fruit. It took all of 1 minute in the microwave. Oh, dear Heaven, it was good! Originally 352 calories, I don't know how many I added with candied fruit, but it was worth every decadent bite.
Here's the ingredients but you should visit https://www.wholesomeyum.com/recipes/vanilla-mug-cake-paleo-low-carb-gluten-free/ for complete instructions. And by the way, I used vanilla.

  • 1 tbsp Coconut oil (measured solid, then melted)
  • 3 tbsp Unsweetened almond milk (or any milk of choice)
  • 1 medium Vanilla bean (seeds scraped) - or 1/2 tsp vanilla extract, see notes*
  • 3 tbsp Almond flour
  • 1 tbsp Coconut flour
  • 1 1/2 tbsp Erythritol (or any sweetener of choice)
  • 1/2 tsp Gluten-free baking powder
  • 1 pinch Sea salt
  • 1 large Egg
  • Friday 10 November 2017

    It Was A Good Idea But...

    Three days it took me to finish this thing and the best I can say is that I learned a lot. I tried engraving with ferric nitrate, after finally getting some from Lacy Tools in Vancouver.
    Two engraving lessons for me: 1) use a better resist than a permanent marker and 2) leave it in overnight to get a good definition.
    I thought copper would be the best background for a gorgeous piece of tiger eye that's been sitting around for a year. Note to self: use silver. I invested in some copper solder but it melts with a silver finish. Put some rusty bolts in the pickle and that gave it a beautiful gold finish which came off when I sanded. Silver is so much easier to work with and even hard silver solder is easier to melt where you want it than the copper paste solder.
    And finally: Quit being in such a hurry and measure better!


    Sunday 22 October 2017

    Working on Metalsmithing

    I've had a little slice of quartz druzy for over a year (probably over two years!) that I'd haul out and stare at, trying to figure out the best way to mount and showcase it. In my mind, a bezel setting would detract from the lovely flower-like aspect but I didn't know if I had the skill to do anything else.
    It was out being stared at again this week, sitting on a piece of paper on my workbench, and I started to draw settings around it. And thus was born the idea for my most challenging soldering experiment yet.
    The diamond-shaped part of the frame and the inner circle are 16 gauge round wire and were fused together.
    I'm using argentium and like soldering, if you have a good join, you see a flash and the metal fuses easily. You just have to be careful not to move the torch flame back on the wires because you'll move molten metal the wrong direction and leave you with a lump where you don't want it. The crosspieces had to be sanded down in a notch where they met so there wouldn't be one teetering wire sitting on top of another. It was kind of like doing logs for a cabin, with a notch on the top of one wire and a notch on the  bottom of the one crossing.  I used hard solder to attach them to the frame and then hard again to set the circle on top
    of them. In the process, I lost my fear of hard solder. I didn't think my torch was hot enough to melt the solder before it melt the wires. There again, using argentium made a difference and fine silver would have the same properties. You don't need to heat the whole piece to cherry. I just gently heated the whole piece and then concentrated the flame on the join.
    The trickiest part was adding the wires for the prongs. I filed one end into points to fit into the four angles but I'd get three sitting properly and when I'd try to place the fourth, they'd all fall out. Many, many times. I was quite amazed when they all soldered (with easy!) in the correct position. Then I cut them, filed the ends, and filed a little notch near the top of each wire. When they were bent enough that the druzy snapped firmly into place, I gently pushed the prongs over the druzy.
    Because it's argentium, it didn't get firescale during the soldering and only needed two quick baths in my pickle. I had polished it to a beautiful shine and because I can't leave well enough alone, I decided to try out my new liver of sulphur gel to make the druzy really stand out on the pendant. It worked beautifully and I got amazing blues, greens and rusts that were perfect. And then I put a thin coat of Renaissance Wax over it to seal in the colour. Unfortunately, the wax removed all of the good colours and left the pendant looking like it had been left out in the rain for years.  Unfortunately, I had set the druzy before I applied the wax, so now I just have to figure out how to take it back to my original shiny silver, hopefully without having to remove that delicate druzy.


    Sunday 1 October 2017

    Playing With Copper & Acrylics

    I really have to stop experimenting with stuff and get down to what I really want to do, which is enamelling, metal clay and making bezels. Of course, that is all experimental too, since I have no idea what I'm doing.  Oh well, I'm retired and allowed to play.
    Not sure what lead me to try this, and I'm not even sure what to call it. Maybe it was the box of acrylics I just got for a community school painting class. The lighthouse is a no-brainer; it's 10 minutes down the road and one of my favourite places and favourite inspirations. Maybe it was a photo of an amazing piece someone else did with a two-dimensional look, bears over a landscape or something. It might have been wolves or that might have been another one. And maybe it's because I have a nice piece of balsa wood that I've been eyeing for months and trying to decide what to do with it.
    Anyway, it started with a quick sunset seascape with acrylics on the balsa. And it was VERY quick - I didn't prep the wood and I forgot to use water with the acrylics. Then I traced the outline of the little painting onto a piece of 20 gauge copper. Drew the lighthouse and cut it out with my saw. * It looked okay so I tried to put liver of sulphur on the copper and managed to just turn it into dirty looking copper. Then I had to figure out how to put it together and how to string it. I don't know why I didn't just use the wood as the backing but I decided to use a piece
    of 26 gauge copper, making it a three-layer sandwich.
    Can you tell I don't do a lot of planning? Or measuring, for that matter.
    Actually, the 26 gauge copper folded very nicely over the painting, although it took a fair bit of trimming so the fold wouldn't show in front.
    Riveting was the only option for putting the sandwich together, since trying to solder it would turn the painting into a little piece of charcoal. The way I solder, anyway. I have two hole cutters, one a handheld one which does about an 18 gauge hole and one a workhorse, which does big, bigger and biggest. The workhorse was too big and the handheld was too small to fit my rivets. I felt like Goldilocks.  So I set everything aside for a few days. A few days later, I was in the hardware store for something and being a hardware junkie, I was cruising the shelves and saw the cutest little drills ever. I had no idea if they would fit a Dremel. Which they didn't, by the way, the Dremel chuck is too big for the weensy drill shanks. One of the little drills was exactly the size I needed for my rivets so I wrapped the shank with painters tape and that worked perfectly in the Dremel.  Of course I didn't measure.
    I hate doing anything the same twice, but if I do, here is what I would change:
    I would have a plan.
    I would measure.
    I would make the border of the front copper piece thicker, so less chance of rivets touching top and bottom.
    I would prep the board before painting and use water with my acrylics.
    All the pieces would be cut out at the same time and ready for painting/assembly. And they would actually be rectangular.
    The holes would be cut in advance and then the dimples/eruptions could
    be hammered out.
    Liver of sulphur expires. Even the powdered stuff. I found this out. I would use fresh stuff.
    It's fun having the time to play around and maybe some day I'll actually make something so totally unique and beautiful, people will be begging me for a tutorial. Or maybe I'll just have a room full of things that I don't ever want to repeat.  I don't care, I'm having fun!

    * The jewellers' saw - just a funny anecdote. I use a #2 saw blade on everything and have been using the same blade for a couple of years now, with a fair bit of cutting. I was getting a little vain about my cutting skills. I used it so long that it was losing its edge and the blade was getting dull. So I changed it. And then changed the pieces of the new one. And again. Apparently I'm going to have to hire someone to take the edge off my blades before i use them. The jewellery gods make sure I will never have a swelled head.

    Wednesday 30 August 2017

    I don't Know What To Call This One

    It's getting cooler at night and my old house stays pretty cool in the heat of the day so I've been inspired to do some making that requires heat.
    The number of times I've ordered round copper blanks lately is annoying because they haven't been in stock at several different companies. My disc cutter doesn't cut them big enough for what I need at the moment and I keep putting off my enamelling lessons because I was too lazy to saw some.  The alternative yesterday was housework so sawing it would be.  I  want to enamel and don't know why I put it off, because I love sawing metal and I'm not bad at it.
    As I was sawing happily and mindlessly, putting a couple of cut blanks in my enamelling drawer I noticed some copper washer rings and my brain shifted out of neutral. I decided to saw out the bust of a Pegasus and, after some deliberation, decided to put it on one of the washer rings. Used my copper solder for the first time. Pickled and burnished. It was pretty but blah. No contrast. So I used some African Gold wax on the ring. That made the head look blah. Have a tiny bottle of silver glitter stuff that's supposed to be mixed with adhesive, resin or polymer clay, so I mixed it with some Diamond Glaze and painted it on. For some reason the Diamond Glaze took all the glitter out of the silver and it ended up looking an ugly matte grey. So I waited for it to partially set and then scraped and sanded it off. Decided to try Liver Of Sulphur. Got out my old bottle and tried to mix some of it with hot water. One lesson of many today - L.O.S. doesn't last 10 or more years, even in a plastic bottle and double freezer-bagged. It's powder! It's supposed to last forever! Anyway, after repeated dunkings it turned the copper a little bronze but not much.
    Thought it might do so I took the pendant back to my desk and tried to sand the high points. It just made it streaky looking so I sanded it all off the horse, left it on the ring. Next thought was to just put some crystalline wax on the whole thing and leave it. Put too thick a coat on, went to visit a friend for an hour and when i came back, the whole pendant was streaked with an ugly sticky finish. Cleaned all of that off and put a fine film over the whole thing, strung it and put it away.
    And then I wonder why I can only get one piece done in a day.

    Sunday 13 August 2017

    Banged Bangle

    Almost perfected!  I made myself a bangle today. Kind of silly because I rarely wear jewelry and I'll wear it today and probably forget about wearing it most other days. I felt guilty because I should have been out mowing the lawn so I had to do something productive in order to justify being inside instead of doing my chores.  Now that it's finished, I can have a guilt-free nap.

    This bangle was pretty simple to make and started with an 8" piece of copper tubing. I have man-sized wrists and hands, thus the length; anybody else would probably only need 6"

    All you have to do is hammer all your frustrations onto the piece of tubing so that you've got a piece of flat, doubled copper. I was too lazy to sand by hand, so I used the sanding attachment on my Dremel and it made it nice and shiny. Mark the holes for your rivets and Voila! It should have been annealed before bending into a bracelet shape but again, too lazy to do the cleaning up afterwards. Besides, what's the use of having man hands if you aren't strong?

    The change I would make in the next one is to put any decorative rivets closer to the middle because they leave a bit of a shoulder where they are, 1/2" out from the central decoration. A quarter inch would have probably been perfect.

    Tuesday 1 August 2017

    I Like Craftsy

    Prince Edward Island is where I've called home for the past 13 years and I love it here. Beautiful beaches around every corner, hot summers, normal Canadian winters and complete strangers who actually smile at you in the supermarket.

    These pictures aren't the beaches, they're from my favourite place to take visitors, Sea Cow Head.

    A lighthouse, gorgeous view of the Confederation Bridge and red cliffs, water...who could ask for more. Just make sure you have mosquito spray!


    The only things missing in my world are classes to help me advance my jewellery-making education. Enamelling, metalsmithing, metal clay work...all things that I want to learn and I would like to learn them without spending a fortune on metals that will end up being discarded.  Since I haven't been able to access real live teachers, online is my only option and I have found Craftsy to be about as close to a real teacher as you can get. The only thing missing is the camaraderie of fellow students. Their prices are terrific, especially if you take advantage of their frequent sales and the teachers are wonderful. Over the past few years, I've bought quite a few of the jewellery making classes and love to be able to watch them over and over.

    The latest Craftsy class I bought was Settings For Every Shape, by Robert Dancik. It reminded me of several methods I had forgotten about and showed me the proper way of doing them. And it addicted me to making metal boxes.

    I get a lot of sea glass and get bored with just wire wrapping it, so I try a lot of different settings, some good, some not-so-good. I'll leave it to you to decide.

    This is derived from the Tab Setting lesson. Argentium silver, it has a cut-out in the back to let the light shine through the sea glass, and my inspiration was seaweed cradling the glass.


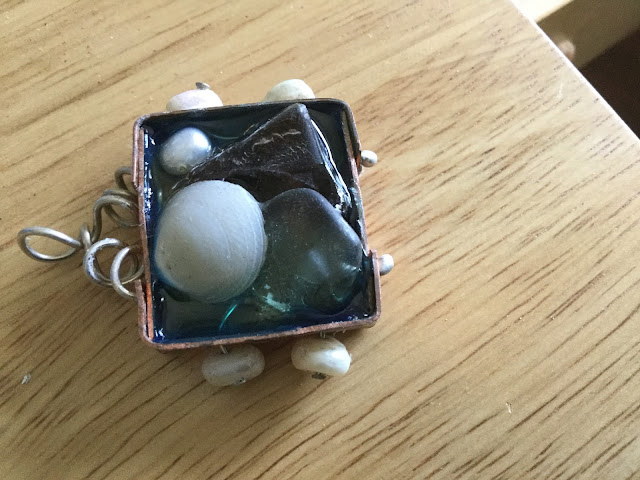
    These were two of my boxes and like them or not, they're a lot of fun to make. Sea glass, shells, pearls, anything goes. I had originally filled the boxes with concrete and preferred the rustic look but I wasn't using the proper concrete and it all flaked out. So plan B was to try resin. I was too lazy to mix up a batch of 2 part resin so I just used Diamond Glaze.

    Thursday 18 May 2017

    Learn from my mistakes

    A lesson In What Not To Do With Enamel

    Maybe I'm too impatient to ever become any good at enamelling. Or maybe I need a more dedicated space to work at it, so I don't rush to be finished so I can put my kiln away and clean the table for supper. Or maybe I'm just looking for an excuse.

    Bear in mind that I didn't properly sand these pieces because they aren't going anywhere so you will see some of the cloisonné wires that would normally be sanded out.


    These are my favourite pieces and I'm mad at myself for messing them up. They are simple cloisonne and meant to represent the red cliffs of Prince Edward Island at the edge of the sea.
    My use of colours was pretty good and I paid attention to Ricky Frank's instructions about using a salt-and-pepper method to blend colours. I paid attention to his hint to slightly dome the piece so there wouldn't be as much stress. What I forgot was to put a layer of counter enamel on the backs. Between the lack of counter enamel to relieve stress and probably an overly thick layer of transparent on top because I got impatient,  the glass cracked in the last firing.


    This was another cloisonne piece and I used glass threads on top of the design. I really like it and it would have been a nice piece once sanded and with another few coats of transparent, except for one really really dumb mistake.
    I cut the piece at the top to make a bail. Bend it and roll it over and it would make a lovely, enamelled bail. Yup. Try bending glass.


    This piece WAS really pretty before I fired it the second time. Another one with glass stringers and I should have given up on it before it ever went in the kiln. I'd put the stringers on in the design I wanted, and lift the firing screen to put it in the kiln and my hand would shake and the whole thing would fall apart. About five times. Of course, by the time I finally got it in the kiln, I had my fingers all over it and by that time I was getting a turkey ready for the oven so this lesson is that greasy fingers and enamelling don't mix.


    And one last lesson that should be obvious. Because I'm using copper until I figure out what I'm doing, I get a lot of firescale on the back of the pieces. Especially when you forget the counter enamel. When you are doing cloisonne, you have to put multiple layers of thin transparent over the piece to build it up to the top of the wires. I was using powdered transparent and as I shook it on, I was shaking little pieces of firescale onto the paper below, and then I'd pour it back into the container, thinking the screen would filter it out. It doesn't. You can really see the little flakes on the first picture. Guess I'm going to have to break down and order more transparent. And be a little less thrifty.

    When you don't have access to classes, except online, learning things like enameling and metalsmithing is definitely a lesson in humility. I suppose the advantage to doing it without an instructor is that, unless you post it on a blog, nobody else has to see your blunders. Anybody who is interested in trying cloisonne, Ricky Frank of Rio Grande has some terrific You Tube videos. For straight enameling, try Craftsy; they have torch fired enameling, which is fun. You didn't get the pictures of that.


    Monday 15 May 2017

    Sea Glass Fun

    There's nothing more exciting than finding a nice piece of sea glass on a beach walk. And it's particularly nice if you can make a piece of jewellery with sea glass that has a provenance.
    This piece of pale blue is from Old Chelton Beach in PEI. I was practicing different types of bezels from a Craftsy class and this one decided to be a little organic, reminding me of seaweed cradling the glass. It is made with .999 silver and my original plan was to antique it but it looked too nice with the bare silver. In my opinion lol.


    Wednesday 22 March 2017

    Game Of Thrones - Bah!

    I just binge read all 5 books of George Martin's Game Of Thrones and now I'm sorry I did. I've never watched the TV show of the same name and if I had, would probably not have started the books. Couldn't put them down, mind you, and had a couple of 4 and 5 in the morning sessions.
    Each book gets progressively darker and weirder, with a cast of way too many sadistic and monstrous characters. The only ones with redeeming qualities seem to get killed off or ignored in the story line. Book I sucks you in by making you want to know the story of the Stark children which is why I read and read and read, only to finish book 5 still not knowing where they will end up.
    I should know better, after reading Robert Jordan's Wheel Of Time series, which went on for something like 13 books and kept me waiting year after year for the next one to come out. And then Jordan died before the last book was published. I figured it was either him or me. That series was much better, with a smaller cast of characters in which you could invest your liking and interest. Game Of Thrones has too many bloody (literally)  plot lines that you have to read to see if the people you're interested in happen to make an appearance. The books are so long they read like a gory Charles Dickens, like Martin is being paid by the word. I guess with the TV series, he is.
    Now I should really do some housework.

    Wednesday 15 February 2017

    Gluten Free Deep Fried Fish

    There are so many people diagnosed with celiac disease that feeding them has become a profitable market and it's much easier now to get half-decent tasting food. I don't feel deprived, although, occasionally I miss a really good craft beer and pub style chicken wings or fish and chips. The fish and chips craving seems to come on those miserable, cold winter days when your body says, "feed me carbs! Now!"
    My Christmas present to myself was a little T-Fal deep fryer and its purpose was to fulfill the carb craving by deep frying little spring rolls made of rice paper, shredded meat, carrots and cabbage. I figured the healthy inside made up for the fried outside. It's amazing what you can talk yourself into believing.
    In a fit of trying to make myself eat more healthy food, I bought a package of frozen cod fillets. So, naturally, I looked for the most fattening way I could cook them. When I stumbled across this recipe on reclaimyourhealth.com.au, I thought I'd try it but didn't hold out much hope that it would taste like fish and chip shop fish. BUT IT DOES!!! It's probably even better than some shops sell and the unfortunate part is that, now that I've tried it, I'll want it often. So much for dreams of boiled cod and veggies.
    This will make enough batter for 6 large fish fillets. I quartered the recipe to cook one and still had enough left over that I could have cooked 3 more.

    Best Gluten Free Fish Batter
    2 cups rice flour (I used a blend without Xanthan gum from Bulk Barn)
    1 tablespoon baking powder
    3 teaspoons sea salt
    1/2 teaspoon pepper (optional)
    350 ml sparkling water or soda water
    1 egg beaten (quartering this was impossible, so I used a whole egg and a little less water
    1/2 cup rice flour for coating
    Oil for deep fryer - coconut oil would be a healthier choice

    Mix together the rice flour, baking powder and salt in one bowl and the water and beaten egg in another. Pour the water mixture into the flour  and mix until smooth. It shouldn't be a thick mixture, more like a pancake mixture.  Dredge the fish in the flour, shake off excess and dip in the batter until coated, shaking off excess. Deep fry in preheated oil 4 - 6 minutes until crispy.
    Make sure your oil is good and hot before putting your fish in and this will prevent too much oil soaking in. Rest the fish on a paper towel when removed to blot up excess oil.

    Maybe I'll lose weight when it's warm again.


    Sunday 12 February 2017

    I'm back!

    Have you ever noticed that as you get older, time seems to compress? I can't believe that it's been two years since I posted.
    Started doing agility trials with my dogs, practice a lot, sold my store this fall, bought the SC2 kiln I've always wanted, am making a lot of mistakes teaching myself enamelling and that's basically my life the past few years. Now that I've got my head around the fact that I'm free, it's time to start creating. Hopefully.
    I've always wanted to make the little clothes out of metal, maybe because growing up I wanted to be a fashion designer. Didn't happen but I made really good cutouts for myself as a kid, haha. So...looking through my idea book, I saw a sketch of a dress. It's bloody cold, so I decided to make shorts and a top on a hanger. Wishful thinking. Can't visualize well from a sketch so I decided to do a prototype. I used 26 gauge brass, thin enough to cut with scissors. Sketched the shorts and top at the bottom of the piece of metal, folded it and cut around the first pattern. Remember, this was a prototype so I could have done it much neater. Once it was cut out, it needed some serious filing, since the metal was so sharp. Then I took some 18 gauge hardware store copper and designed the hangar, just by bending and making a loop. Next time, I'll put a small straight stretch under the loop and a couple of rings of binding wire around it to look more like a hangar. That's why I need a physical prototype.
    Once I got all of that done, I realized that done properly, all of this could look really good and definitely wearable without enamel and without a kiln. And without soldering, which is how I was going to join the back and front.
    Cut out the back and front of your design,  fold in half. It doesn't matter what gauge metal you use, but the heavier the gauge, the more careful you will have to be folding.
    Bend your wire for the hangar.
    Place the hangar to hang the outfit. I used the blade of a pocket knife to open the design enough to slide it in. Then use E6000 or Krazy glue to glue the front to the back, under the hangar. Put something heavy over it until glue dries.
    Paint with nail polish or permanent markers. It wouldn't hurt to put a coat of clear resin over it to keep your colours safe.
    Hang!
    If you want one for winter, how about a pair of red long-john combinations?
    How easy is that?