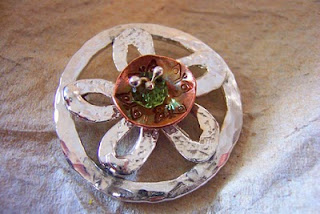
The flower in the picture is one of my first efforts at silver clay and definitely not something to write home about. But my philosophy is that every mistake has the opportunity to become "art" if you make it look like it was intended to be that way. And I'm stubborn, just ask my mother.
I also wanted to try riveting. Never having done it before, I couldn't start with just a simple riveting job, I had to try something different.
Okay, here's the basic premise. The flower is sitting inside a hollow white plastic thingy, so that's not part of it.
Isn't it pretty? So far so good. I soldered the metal clay flower to a hammered 12 gauge ring, also soldered. I had a little trouble here...I have medium and soft solder and for some reason, I can't get the medium solder to melt. My torch is certainly hot enough, because it was melting the flower. So I switched to the soft solder and got the job done.
The centre part is just sitting on the flower.
I punched out a copper circle, stamped and dapped it, and set a flat peridot crystal on top of it. Now here's the part that should have been a wonderful example of ingenuity. I balled three pieces of 24 gauge wire and threaded them through the peridot and copper. Then I twisted them together tightly and cut them off about a quarter inch below the flower.
I blame this next part on Janice from The Jewelry Artists Network. She had a wonderful tutorial on her blog "A Metalsmith's Journey" about creating a ball on the opposite side of a ring. It involves soaking manila file folders and wrapping the bead and bottom of the item in the soaked card stock. Well, Janice must use better quality manila folders than me, or she isn't dumb enough to twist three wires and expect them to ball up. I set off the fire alarm but the wires were not going to ball up, uh uh, no way. And yes, wet card stock does catch on fire.
Okay, plan B. I cut the twisted wire off a few mm from the end and decided to rivet. Twisted wire does not rivet any better than it balls up. It separated as it was hammered, and although it was flat against the back of the flower, it didn't look strong enough to hold the balled pins in place if it had any stress at all. So what to do? By this time, I was out of plans, but not out of stubborn.
Something had to hold the "riveted" wires on the flower and keep them still. So I took about an inch of 12 gauge wire and balled it on my fire brick. Then I soldered it on top of the flattened wires with soft solder. It looks pretty good in the picture, but by this time the front of the flower and the copper was heat patinaed and looked like heck. Luckily, the peridot didn't crack or discolor. It took a lot of sanding and tumbling to get it halfway looking decent, but I figured the copper would eventually darken anyway, so I just hurried the process.
So here's the end result. Definitely "art" because the imperfections were intended, of course. Yeah, right. By this time, the sun had left, so the picture isn't as good as the first and the darkness at the bottom of the ring is shadow, not firescale. But the darned thing is finished and this is what I learned:
Having a teacher or taking classes would be a lot easier on the nerves. But anything can be fixed if you're stubborn enough. And I should never do tutorials.


Lovely "save". Is it going to be a pin or a pendant? Just realized I haven't touched my metal clay in over a year :( You always provide inspiration.
ReplyDelete